

Support -> How To Block a Time Slot for a Staff Member
How To Block a Time Slot for a Staff Member
This guide will show you how to ensure a staff member is not available by blocking a time slot within the staff scheduling software.
Step 1. Enter the "Staff Day Planner" Section
After selecting the "Planners" tab in the staff scheduling software, select the "Staff Day Planner" option.

Step 2. Select The Block Time Details
Select the location, if applicable using the drop down menu to the left of the booking planner.
Also select the date using the mini date calendar. The selected date will become blue and schedules
for that day will appear on the planners. You may also scroll through the dates using the
arrows located above the daily schedule.

Step 3. Highlight the Appointment Block on The Scheduling Calendar
In the column corresponding to the staff member for whom you would like to block time, left-click
on the time you want the blocked period to begin. Without releasing the button, drag the cursor to the
end time of the blocked period and release the button.

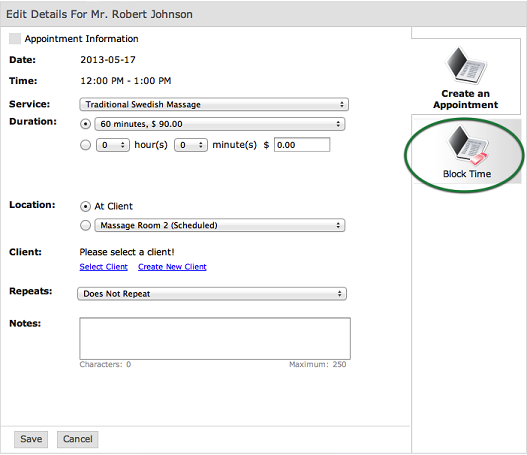
Step 4. Confirm Blocked Time Details
In the window that appears, click on the "Block Time" tab.
Indicate the reason why the staff member cannot be scheduled for appointments. You may also add a note in the text field.
Click on save after all the required information has been entered.
IMPORTANT
- Once a time slot is blocked, it no longer appears as available on the customer booking portal. Customers will not be able to book an appointment during that time slot.
- Appointments cannot be booked internally during that time slot.
© 2009 - 2019 calendarspots.com