

Support -> How To Book an Appointment (Step-by-Step Method)
How To Book an Appointment (Step-by-Step Method)
This guide will show you how to create an appointment using a day planner within the calendar scheduling software by following a step-by-step method.
Step 1. Access the "Staff Day Planner" Section
After selecting the "Planners" tab in the calendar scheduling application, select the "Staff Day Planner" option.

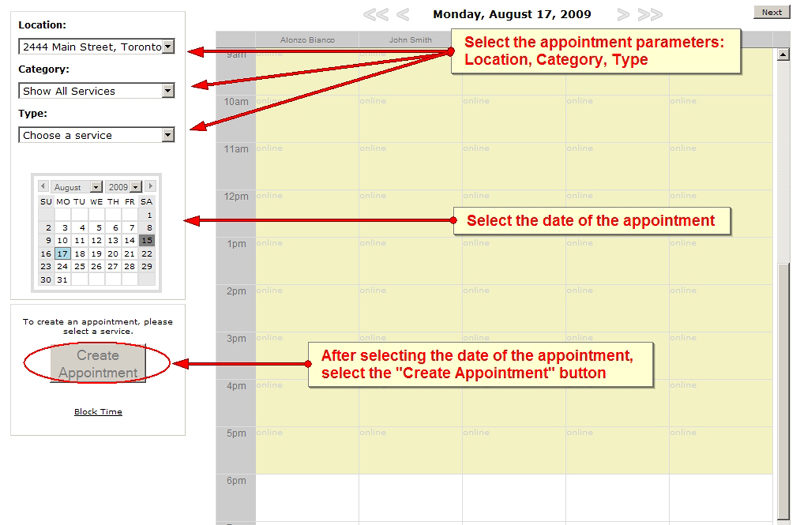
Step 2. Select the Location, Category, Service, and Date of Appointment
In the drop down menus next to the daily schedule, select the location where you would like to book
your appointment, the category of service, and the type of service. Next, in the interactive
calendar, select the date of the appointment. The selected day will be highlighted in blue and the
day's schedule will appear to the left. Lastly, click on the "Create Appointment" button to create
the appointment.
If your account only has one location and a few services, you can simply select the type of service in order to enable the "Create Appointment" button. This will speed up the appointment booking process. Otherwise, if you have many services, it may be easier to first filter the service options by choosing a category.
If your account only has one location and a few services, you can simply select the type of service in order to enable the "Create Appointment" button. This will speed up the appointment booking process. Otherwise, if you have many services, it may be easier to first filter the service options by choosing a category.
Step 3. Select a Client for the Appointment
In the window that appears, select the client you want to book the appointment for. You may select
the client by entering his or her name, e-mail, phone number, or group in the text field; you may also
find your client in the paginated results. If the client does not yet exist in the database, you may add him
or her by clicking on the "Create New Client" link in the top right corner of the window. You can also select
a client that is currently waiting for an appointment by clicking the "Waiting List" link.

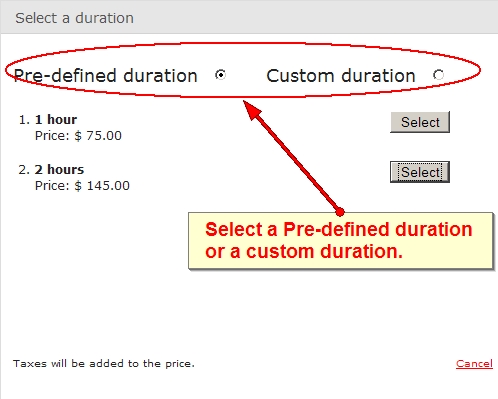
Step 4. Set the Appointment Duration
In the window that appears next, select the duration of the appointment by selecting one of the default
options (these are set in Settings Section) by clicking "Select" next to the desired duration. Alternatively,
you may select a custom duration by selecting the "Custom" button. Enter the duration of the appointment
(hours and minutes) and enter the price of the custom appointment. Once you have entered the required
information, click on "Select".
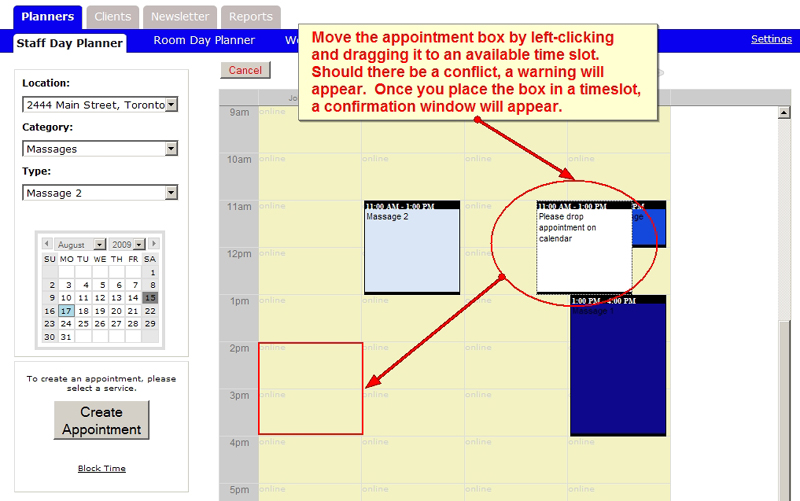
Step 5. Drop the Appointment on the Scheduling Calendar
An appointment box will appear in the scheduling calendar; it is sized to match the duration of the selected
appointment. Note that only available staff will appear in the schedule and time slots already booked
for other appointments will be blocked off. Using the pointer, select the appointment box header
(at the top of the block) by left-clicking it, drag the box to the desired time slot (the time slot must
be free for the entire duration of the appointment), and drop the box on the calendar by releasing the
left button. Should there be any conflict with resources (such as a room conflict), a warning window
will appear. You may select a new time slot by moving the appointment box to another available time slot.
You may cancel the appointment scheduling process by clicking on the "Cancel" link.
Note that you can also change the date of the appointment at this point by choosing a date on the mini-calendar on the left or by clicking thte arrows above/below the booking calendar.
Note that you can also change the date of the appointment at this point by choosing a date on the mini-calendar on the left or by clicking thte arrows above/below the booking calendar.
Step 6. Confirm the Appointment
Once you drop the appointment box in a suitable time slot, a confirmation window will appear with the
appointment details, including price and room. You may also add a note in the text field. To confirm the
appointment booking, simply click on the save button at the bottom of the screen. You may select a new time slot by
clicking on the "Modify" button and moving the appointment box to a new time slot.

NOTES:
a) Once a time slot is booked, it no longer appears as available in the customer portal: customers will not be
able to book another appointment during that time slot.
b) Appointments may be internally booked outside the available times displayed in the schedule (shown in yellow background).
c) A grey time slot background in the schedule indicates that the time slot is only available for booking through the online
portal. This occurs when you have set a different schedule for your online portal.
d) All appoinments with an "Attended" status are archived in the system or future reference. The status may be
changed manually in the appointment details window, or may be set to "Attended" automatically by selecting this
option under "Advanced Settings". All "Attended" appointments are archived at 12AM every day.
e) If you find the booking process too long, you can also book an appoitment by
directly clicking and dragging on the booking calendar.
© 2009 - 2019 calendarspots.com