

Support -> How To Add a Logo and Background Image to the Customer Portal
How To Add a Logo and Background Image to the Customer Portal
This guide will show you how to upload images to your client portal within your booking appointments software.
Step 1. Enter the Edit Header Section
After selecting the "Customer Portal" tab in the Settings page, click on the "Edit Header"
option.

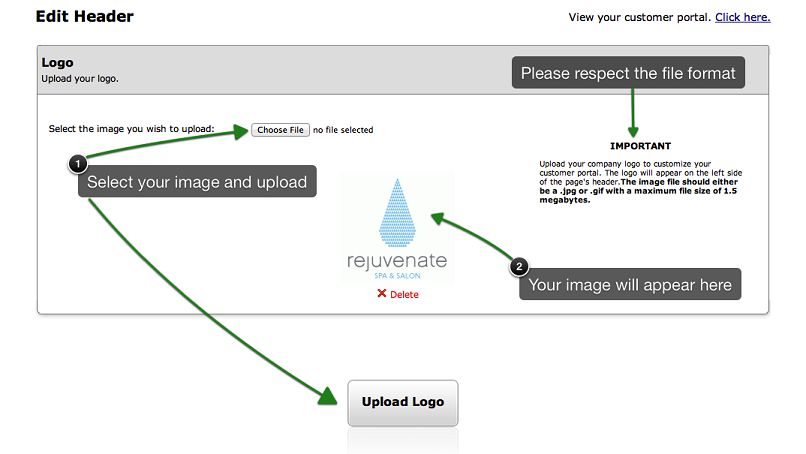
Step 2. Upload Your Logo to Your Online Booking Portal
In the "Logo" Section of the page, click on the "Choose file" button to access your files and folders.
Select the image you want to display as your business logo. Please note that the image file should
either be a .jpg or .gif with a maximum file size of 1.5 megabytes. To upload the logo, click on the
"Upload" button. To see how your customer portal will look, click on the link next to "View your
Customer Portal."
We suggest uploading an image that has a width of 150 pixels and a height of 125 pixels.
We suggest uploading an image that has a width of 150 pixels and a height of 125 pixels.
Step 3. Upload a Background Image to Appear in the Header of your Customer Booking Portal
Improve the look of your customer booking portal by adding a background image. The background image
will appear in the header section and cover the width of the screen.
In the "Background Image" Section of the form, click on the "Choose file" button to access your images. Select the image file you want to include in the background of your header. The image file format should either be a .jpg or .gif with a maximum file size of 1.5 megabytes. To upload the image, click on the "Upload" button.
We suggest uploading an image that has a width of 1400 pixels and a height of 400 pixels. The orientation of the image should be horizontal (landscape) as opposed to vertical (portrait). Also note, the image may be strecthed depending on the resolution of the screen. Therefore, the background image may look different on a smartphone in contrast to a computer screen.

© 2009 - 2019 calendarspots.com